Make Healthy Mini Vegan Peanut Butter Cups in 15 Minutes
Do you remember that indescribable joy of unwrapping a classic chocolate-and-peanut-butter confection? For many, the irresistible combination of rich chocolate and creamy, slightly salty peanut butter is the ultimate indulgence. While store-bought versions certainly hit the spot, they often come with a laundry list of questionable ingredients, excessive sugar, and artificial additives. What if we told you that you could recreate that magic at home, not only making it healthier but also quicker and more satisfying? Prepare yourself, because we’re about to dive into the wonderful world of homemade mini vegan peanut butter cups – a treat so delightful, you’ll wonder why you ever bought them from a store.
This isn't just any recipe; it's a game-changer. In roughly 15 minutes, you can whip up a batch of these delectable, guilt-free treats that are perfect for a post-lunch pick-me-up, an afternoon snack, or a delightful after-dinner bite. Forget the blood sugar spikes and hidden nasties; our version focuses on whole, natural ingredients, ensuring every bite is packed with healthy fats, antioxidants, and pure, unadulterated flavor. The best part? You get to control every single element, from the intensity of your chocolate to the exact sweetness of your peanut butter filling. And trust us, when it comes to peanut butter cups, the mini version truly is superior, offering that perfect, coveted peanut butter-to-chocolate ratio that makes every bite heavenly.
Why Homemade Mini Vegan Peanut Butter Cups Reign Supreme
There's a reason why the thought of making your own sweets can be so appealing, and it goes far beyond just saving a few dollars. When you craft your own mini vegan peanut butter cups, you unlock an unparalleled level of control and customization that commercial products simply can't offer. This mastery over ingredients is the cornerstone of a truly healthy and satisfying dessert.
First and foremost, ingredient transparency is key. Store-bought candies, while convenient, often contain refined sugars, hydrogenated oils, artificial flavors, and preservatives that can detract from both their nutritional value and their pure taste. By making your own, you choose natural, high-quality components. Opt for dark chocolate that's certified vegan and preferably organic, ensuring you're getting a powerful dose of antioxidants without any dairy. Select an all-natural, unsweetened peanut butter, allowing you to manage the saltiness and sweetness precisely.
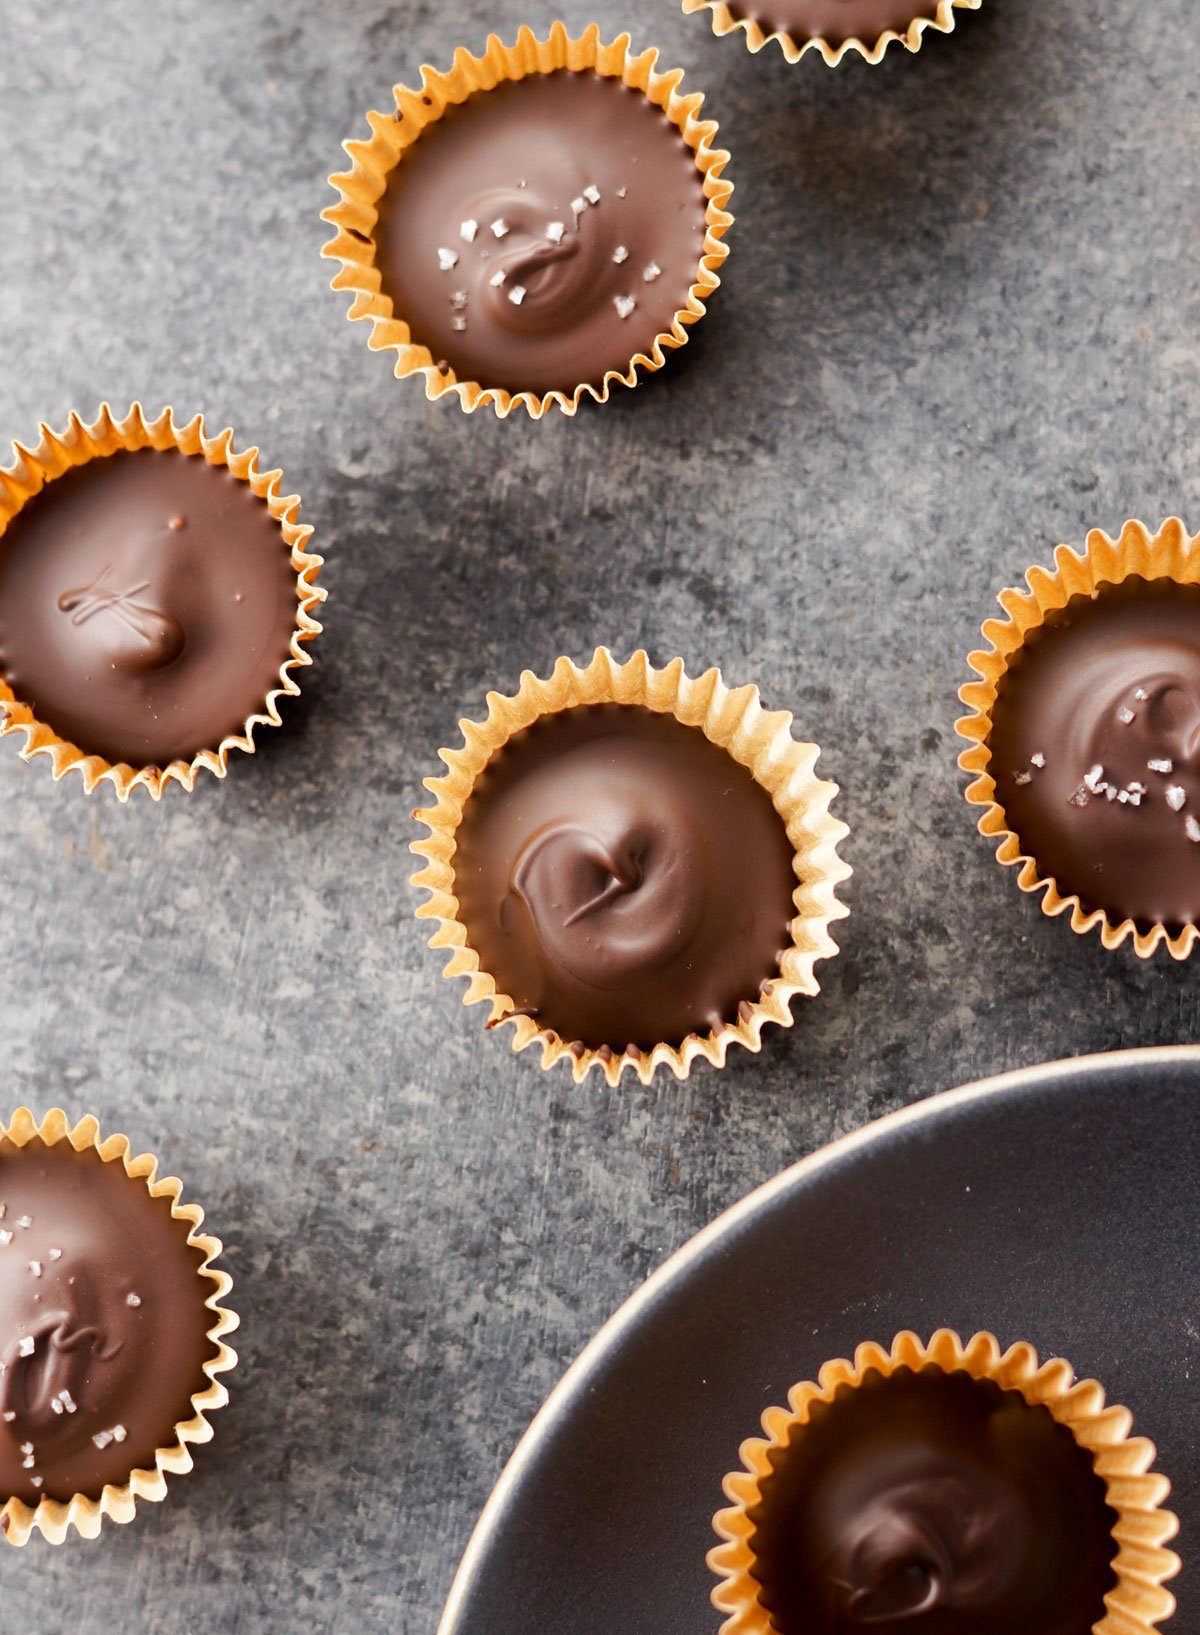
Beyond health benefits, there's the undeniable charm of the "mini" size. Many aficionados of the classic peanut butter cup agree: the smaller versions are simply better. Why? It all boils down to the perfect peanut butter-to-chocolate ratio. With a mini cup, you achieve an ideal balance in every bite – enough chocolate to provide a crisp shell and rich foundation, but not so much that it overwhelms the creamy, nutty filling. This delicate equilibrium creates a more intense and satisfying flavor experience, preventing the sometimes cloying sweetness of larger cups. It's a small detail that makes a monumental difference.
Furthermore, homemade means you can cater to specific dietary needs with ease. Whether you're avoiding gluten, dairy, or refined sugar, this recipe can be adapted. For those on a candida diet, for instance, you can use almond butter and raw cacao while omitting maple syrup, still yielding an incredibly delicious and permissible treat. This level of personalized nutrition and taste simply isn't available on grocery store shelves.
The 15-Minute Marvel: Unlocking Speed and Simplicity
One of the most compelling aspects of these delightful mini vegan peanut butter cups is their incredible speed and ease of preparation. We're talking about a "no-bake" wonder that comes together in roughly 15 minutes of active time, making it the ultimate solution for a sudden sweet craving or an impromptu gathering. This isn't just fast food; it's fast *healthy* food.
The secret lies in a minimalistic approach to ingredients and a straightforward method. You'll typically need only four core components to create this magic:
- Vegan Dark Chocolate: Chosen for its rich flavor and antioxidant properties.
- Natural Peanut Butter: The creamy, nutty heart of the cup.
- Maple Syrup (or another natural sweetener): To provide a hint of sweetness to the filling without refined sugars.
- A Touch of Coconut Oil: Essential for helping the chocolate melt smoothly, set firmer, and give it that satisfying snap.
The process is remarkably simple. First, you'll gently melt your chosen vegan dark chocolate with a spoonful of coconut oil until it's silky smooth. This can be done in a microwave in short bursts or over a double boiler. Next, you'll combine your natural peanut butter with a touch of maple syrup and perhaps a pinch of sea salt for that classic sweet-and-salty dynamic. Then comes the assembly: a thin layer of melted chocolate in mini paper liners or a silicone mold, followed by a dollop of the creamy peanut butter filling, and finally, another thin layer of chocolate to cap it off. A quick chill in the freezer or fridge, and voilà – you have perfectly set, ready-to-enjoy treats.
This rapid turnaround time means you can decide you want a healthy snack and have it ready before you've even finished browsing your social media feed. It eliminates excuses for reaching for less healthy options and empowers you to consistently make wholesome choices without sacrificing flavor or convenience. It truly proves that homemade, healthy, and delicious can absolutely go hand-in-hand with speed and simplicity.
Crafting Your Perfect Mini Vegan Peanut Butter Cups: Ingredients & Customization
The beauty of making your own mini vegan peanut butter cups lies in the freedom to tailor them exactly to your taste and dietary needs. Each ingredient offers an opportunity for personalization, transforming a simple recipe into a culinary adventure.
Peanut Butter Power & Alternatives
The star of the show, of course, is peanut butter. Opt for a high-quality, natural, unsweetened peanut butter with minimal ingredients (ideally just peanuts and salt). This ensures you avoid added sugars and unhealthy oils. However, if peanuts aren't your preference or you have an allergy, this recipe is incredibly versatile. You can easily substitute with:
- Almond Butter: Offers a slightly milder, nutty flavor and a different nutritional profile. The reference context confirms both almond and peanut butter yield amazing results.
- Cashew Butter: For an exceptionally creamy and subtly sweet filling.
- Sunflower Seed Butter (SunButter): A fantastic nut-free alternative for those with severe allergies.
Each nut or seed butter will impart a unique character to your cups, inviting you to experiment and find your personal favorite.
Chocolate Choices & Antioxidant Benefits
The chocolate you choose plays a crucial role in both flavor and health benefits. For a truly healthy treat, select high-quality vegan dark chocolate. Look for varieties with a high cocoa percentage (70% or higher) to maximize antioxidant content and minimize sugar. Dark chocolate is known for its heart-healthy flavonoids, making these cups not just a treat, but a beneficial indulgence. You can find many brands that are explicitly labeled vegan, ensuring no dairy products are used in their processing.
Sweetener Savvy & Diet-Friendly Adaptations
For sweetening your peanut butter filling, maple syrup is a fantastic refined sugar-free option, adding a lovely depth of flavor. Other natural sweeteners you could consider include:
- Agave Nectar: A neutral-flavored alternative.
- Date Syrup: Adds a rich, caramel-like note.
- Stevia or Erythritol: For a truly sugar-free option, particularly useful if you're managing blood sugar or following specific diets.
Speaking of dietary considerations, this recipe is a dream for those with specific needs. It's naturally gluten-free and dairy-free, catering to common intolerances and vegan lifestyles. For individuals on a candida diet, the adaptability is particularly beneficial. As hinted in the reference, you can completely omit the maple syrup and use raw cacao powder instead of melted chocolate for the coating (or simply use unsweetened dark chocolate). The result is still surprisingly delicious and perfectly aligned with strict dietary protocols.
Optional Enhancements for Extra Flair
A few extra touches can elevate your mini cups:
- Pinch of Sea Salt: A tiny sprinkle in the peanut butter filling enhances both the sweet and savory notes, creating that coveted dynamic.
- Vanilla Extract: A drop or two in the filling can add a warm, inviting aroma and flavor.
- Coconut Oil: While primarily used for melting chocolate, a tiny amount in the peanut butter filling can make it extra smooth and easier to work with.
- Toppings: A sprinkle of flaky sea salt, chopped nuts, or a drizzle of extra melted chocolate on top before setting can add visual appeal and texture.
By experimenting with these options, you can truly make these mini vegan peanut butter cups your signature healthy treat.
Tips for Flawless Mini Vegan Peanut Butter Cups Every Time
While the process for making these delightful treats is straightforward, a few expert tips can ensure your mini vegan peanut butter cups turn out perfectly every single time, looking as good as they taste.
Choose the Right Equipment
The "mini" aspect of these cups is crucial, and having the correct tools makes all the difference:
- Mini Muffin Tin: This provides the perfect framework for your cups and helps them keep their shape.
- Mini Paper Liners or Silicone Liners: These are indispensable for easy removal. Silicone liners are reusable and often lead to a cleaner finish. If using paper, ensure they are sturdy enough to hold the shape.
- Small Scoop or Spoon: For precise layering of chocolate and peanut butter. A small cookie scoop (about 1 teaspoon capacity) can be very helpful for uniform peanut butter balls.
Mastering the Melt
Melting chocolate can be tricky, but it doesn't have to be. Gentleness is key:
- Double Boiler Method: This is the safest way to melt chocolate slowly and evenly, preventing it from seizing or burning. Place a heatproof bowl over a saucepan of simmering water, ensuring the bowl doesn't touch the water. Stir frequently.
- Microwave Method: If using a microwave, melt in short bursts (15-30 seconds), stirring well after each interval. Chocolate can hold its shape even when melted, so stirring is crucial to prevent overheating. Add a teaspoon of coconut oil to aid in melting and give the finished chocolate a smoother texture and gloss.
The Art of Layering
Achieving that ideal peanut butter-to-chocolate ratio is an art, but an easy one to master:
- Thin Bottom Layer: Start with just enough melted chocolate to coat the bottom of each liner. This creates a solid base without being too thick.
- Generous Peanut Butter Filling: This is where the magic happens! Don't be shy with the peanut butter mixture. Roll it into small balls or press it gently into a disc shape before placing it on the chocolate base.
- Thin Top Layer: Finish with another thin layer of melted chocolate. Gently tap the muffin tin on the counter a few times to help the chocolate spread evenly and release any air bubbles. This also helps create a smooth, professional-looking finish.
The Chill Factor
Patience during the chilling process is vital for perfectly set cups:
- Freezer vs. Refrigerator: For speed, the freezer is your friend, setting the cups in about 10-15 minutes. If you have more time, chilling in the refrigerator for 30-60 minutes can result in a slightly firmer, more evenly set cup.
- Check for Firmness: Ensure the chocolate is completely firm before attempting to remove the cups from their liners. This prevents breakage and messy hands.
Storage Solutions
Once made, these mini vegan peanut butter cups are best stored in an airtight container in the refrigerator to maintain their shape and freshness, especially in warmer climates. They can last for up to two weeks, though it's unlikely they'll stick around that long! For longer storage, you can freeze them for up to a month; just let them thaw for a few minutes before enjoying for optimal texture.
With these practical tips in your arsenal, you're well-equipped to create batch after batch of irresistible, healthy, and perfectly formed mini vegan peanut butter cups that will impress everyone, including yourself!
Conclusion
From a nostalgic craving to a healthy reality, making your own mini vegan peanut butter cups is a rewarding experience that combines ease, speed, and undeniable deliciousness. We’ve seen how these homemade delights offer superior control over ingredients, allowing for a refined sugar-free, gluten-free, and even candida diet-friendly indulgence. The "mini" format is not just cute; it's a strategic design for the ultimate peanut butter-to-chocolate ratio, delivering satisfaction in every bite without overwhelming sweetness.
In just 15 minutes of active preparation, you can transform a handful of wholesome ingredients into a batch of treats that are rich in antioxidants and healthy fats, providing a guilt-free energy boost or a sweet ending to any meal. So, ditch the store-bought versions and embrace the simplicity and joy of crafting your own. Your taste buds, and your body, will thank you for it. Give this recipe a try and discover just how easy and enjoyable it is to have healthy, homemade treats at your fingertips!
